Posts

Showing posts from September, 2022

SSH file configuration Setting. and Testing

I am Using 2 VM for RHEL 8.x  IP 192.168.122.228  Hostname server.example.com IP 192.168.122.71   Hostname Client.example.com 1. How to Change ssh Port. [root@server ~]# vim /etc/ssh/sshd_config ( Change below Line ) #Port 22 to  Port 2022 [root@server ~]# systemctl  restart sshd [root@Client ~]# ssh raju@192.168.122.228 ssh: connect to host 192.168.122.228 port 22: Connection refused [root@Client ~]# ssh -p 2022 raju@192.168.122.228 raju@192.168.122.228's password:  Last login: Thu Sep 22 10:05:53 2022 from 192.168.122.71 [raju@server ~]$  2. How to Change ssh LogLevel. The possible values for LogLevel are: QUIET, FATAL, ERROR, INFO, VERBOSE, DEBUG, DEBUG1, DEBUG2 and DEBUG3. The default is INFO. DEBUG and DEBUG1 are equivalent.  DEBUG2 and DEBUG3 each specify higher levels of debugging output.  [root@server ~]# vim /etc/ssh/sshd_config ( Change below Line ) #LogLevel INFO to  LogLevel DEBUG [root@server ~]# systemctl  restart sshd [root@Client ~]# ssh raju@192.168.122.228 raju@19
How to Create Self-Signed Certificates using OpenSSL

The OpenSSL toolkit is required to generate a self-signed certificate. # yum install openssl Creating Self-Signed SSL Certificate  # mkdir /etc/pki/tls/myssl # cd /etc/pki/tls/myssl # openssl req -newkey rsa:4096 -x509 -sha256 -days 3650 -nodes -out new_example.crt -keyout new_example.key Can't load /root/.rnd into RNG 140468795707840:error:2406F079:random number generator:RAND_load_file:Cannot open file:../crypto/rand/randfile.c:88:Filename=/root/.rnd Generating a RSA private key ................................................................................++++ ................................++++ writing new private key to 'new_example.key' ----- You are about to be asked to enter information that will be incorporated into your certificate request. What you are about to enter is what is called a Distinguished Name or a DN. There are quite a few fields but you can leave some blank For some fields there will be a default value, If you enter '.', the field will be

How to install and renew Free Let’s Encrypt SSL/TLS Certificates

Prerequisites:- A. Have Apache / httpd / nginx installed.  B. WebSite Will be allowable in Public. C. Create a DNS record that associates your domain name and your server’s public IP address. 1. install Certbot PKG. # yum install certbot             ( For Centos or RHEL )  # apt-get install certbot         ( For Ubuntu ) 2. Create Certificate #  certbot certonly --manual -d yourwebsite.domain Saving debug log to /var/log/letsencrypt/letsencrypt.log Plugins selected: Authenticator manual, Installer None Enter email address (used for urgent renewal and security notices) (Enter 'c' to cancel): your_Email_ID - - - - - - - - - - - - - - - - - - - - - - - - - - - - - - - - - - - - - - - - Please read the Terms of Service at https://letsencrypt.org/documents/LE-SA-v1.2-November-15-2017-w-v1.3-notice.pdf. You must agree in order to register with the ACME server at https://acme-v02.api.letsencrypt.org/directory - - - - - - - - - - - - - - - - - - - - - - - - - - - - - - - - - - - - - -

How To Install and Configure Samba Server and Client.

1. Install Samba in Centos / RHEL  [root@Samba ~]# yum install samba samba-common samba-client  2. Create Samba Shares Folder [root@Samba ~]# mkdir  /Samba_Share [root@Samba ~]# chmod -R 777 /Samba_Share 3. Configure Samba Share Path [root@Samba ~]# cp /etc/samba/smb.conf /etc/samba/smb.conf.ORG [root@Samba ~]# vim /etc/samba/smb.conf change the Line:-   workgroup = SAMBA to workgroup = WORKGROUP Edit Below Lines in End of File. [myShare]         comment =  File Server Share For All         path = /Samba_Share         public = yes         browsable =yes         writable = yes         read only = no         create mask = 0644         directory mask = 0755         valid users = sambatest 4. To verify the configurations made, run the command: [root@Samba ~]# testparm 5. Create User and Assign Password.  [root@Samba ~]# useradd sambatest [root@Samba ~]# smbpasswd -a sambatest New SMB password: Retype new SMB password: 6. Start And Enable Samba Service.  [root@Samba ~]# systemctl start smb

How To install and configure Apache / httpd Name Based Virtual Hosting.

I am using Centos 7.x OS Version and Our Requirement is we need to Create. Multiple Website in Single server.  Apache Introduction:- The Apache web server is the most popular web server all over the world. Virtual hosting is a  method for hosting multiple websites (domains) on a single server. You can host multiple websites  on a single machine with a single IP using virtual hosting. All domains on that server will be  sharing a single IP. Virtual hosting is very useful in shared web hosting environments. where hundreds of websites are hosted on a single dedicated server.  1. Install Apache / Httpd PKG. # yum install httpd* -y                          ( For RHEL and Centos ) # apt-get install apache2 -y                 ( For Ubuntu ) 2. Start Apache / Httpd Service  # systemctl start httpd                            ( For RHEL and Centos ) # systemctl start apache2                       ( For Ubuntu ) 3. Enable The Service # systemctl enable httpd                       ( For RHEL and C

How to Create LVM in Linux Step by Step

Image
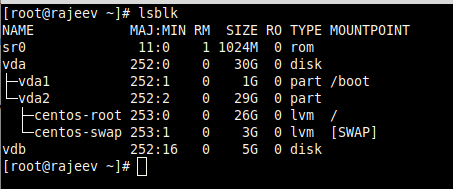
1. Add the new disk As Per requirement in your VM. ( I have add 5GB Disk Space for create the LVM. ) 2. create a new Partition using fdisk tool and select partition type LVM :  [root@rajeev ~]#  lsblk  [root@rajeev ~]#  fdisk /dev/vdb  [root@rajeev ~]#  partprobe /dev/vdb [root@rajeev ~]#  cat /proc/partitions  3. Initializes the partition /dev/vdb1 as an LVM physical volume : [root@rajeev ~]# pvcreate /dev/vdb1   Physical volume "/dev/vdb1" successfully created. 4. Displaying Physical Volumes :  ( You Can Use Any One Command. ) [root@rajeev ~]#  pvs /dev/vdb1 [root@rajeev ~]# pvdisplay /dev/vdb1 5. Create volume group name myvg and add /dev/vdb1 partition into the group. [root@rajeev ~]# vgcreate myvg /dev/vdb1   Volume group "myvg" successfully created 6. Creates a logical volume called lv_myvg that uses all of the unallocated space in the volume group vg_newlvm : [root@rajeev ~]# lvcreate -l 100%FREE -n lv_myvg myvg   Logical volume "lv_myvg" created. 7

How to install and configure NFS server and client in Centos.

  What is Linux NFS Server? Network File Sharing (NFS) is a protocol that allows you to share directories and files with other Linux clients over a network. Shared directories are typically created on a file server, running the NFS server component. Users add files to them, which are then shared with other users who have access to the folder. Define Access for NFS Clients in Export File To enable access to a single client /testNFS {clientIP}(rw,sync,no_subtree_check) To enable access to several clients /testNFS {clientIP-1}(rw,sync,no_subtree_check) {clientIP-2}(...) {clientIP-3}(...) To enable access to an entire subnet /testNFS {subnetIP}/{subnetMask}(rw,sync,no_subtree_check) Setup NFS Server 1.Installing nfs-utils [root@rajeev ~]# yum install nfs-utils 2.Choose the directory to share. If not present create one. [root@rajeev ~]# mkdir /testNFS 3.Add permissions and ownership privileges to the shared directory. [root@rajeev ~]# chmod -R 755 /testNFS [root@